What is Unit and UI testing
You might be wondering why
testing your apps is important, let me tell you a story.
I used to see my mom use a
mingling stick or spoon to get some little soup of meet that she just fried.
Some times she could pick a piece of liver and gets that into her mouth. After
some pause, she could either add some salt or water. Some times she could leave
whatever she was frying on the sauce of heat for some little more time. It was
a few years ago that I came to really understand that it was due to doing such, that she got
us good meals on table. So that was a testing
process.
We also need to test our
android applications to ascertain that they behave and work as expected basing
whatever functionalities we develop them to achieve.
Think of software testing as a process of executing or running an application or program to find bugs or defects. This defects might be in in a block of code (Unit) or the user interface (UI) might be not in one way or another achieving some sort of behavior.
Testing in Android Studio
The Android framework includes an integrated testing frame work that helps you to tell aspects of your mobile applications. The Android SDK and testing support library contain tools and APIs that help you to setup and run the tests on your android device or emulator.
You need to have these important concepts about android application testing which include Test Structure, Testing APIs and lastly Monkey and Monkeyrunner in order be very good at testing your apps.
With the test concepts at your fingure tips, you will find the following UI and Unit testing tutorial easy and awesome.
Let's get started
Start your Android Studio and click on Start a new Android Studio project or go to File then New and click on New Project...
A dialogue window in which you will create a new project will appear,
Use the following to fill the available fields
Application name: Unit and UI Testing
Company Domain: testing.example.com

Click Next, leave the fields on the window next to their default values and click next.
Continue by clicking next to a window where you will select EmptyActivity, this is so to make every thing simple for even beginners to follow along. (I used Android Studio 1.5, feel free to continue if you have Android studio 1.2+)
Click next and go to the next screen. Here ensure that the Checkbox against Generate Layout file is checked and click Finish.

After this milestone, give your project some time to do the gradle builds and indexing, when this is done you will be ready to continue.
Unit Testing
First ensure your project is prepared for Unit Testing, ensure your build.gradle (Module App) dependencies section is having 'junit:junit:4.12' line as showed bellow. If not, please add it there.
dependencies {compile fileTree(dir: 'libs', include: ['*.jar'])testCompile 'junit:junit:4.12'
compile 'com.android.support:appcompat-v7:23.1.1'
}
With this done, go to the build variant section located near the bottom left corner of Android Studio and choose Unit Testing, wait for the gradle build to finish.

You are almost ready however, depending on the version of Android Studio being used you might need to create a folder called test and test/java under your module's src directory. This needs to be done while in project or package perspective instead of Android perspective. Feel free to use the file system as well. You do not need to create the folders above when you have a structure similar to this bellow.

Congratulations upon having setup your development and testing environment, however you have nothing to test so lets create a calculator class. This will be our class under test.
Right click on the package name then go to new and click on Java Class

In the small dialogue window that appears write Calculator as the class name and click Ok. Your Calculator class should look like this code snippet bellow. Feel free to copy and paste whole or part of the following code, do not worry about returning zeros for now.
package com.example.testing.unitanduitesting;public class Calculator {public double sum(double a, double b){return 0;}public double subtract(double a, double b){return 0;}public double multiply(double a, double b){return 0;}public double divide(double a, double b){return 0;}}
We will use Android studio to generate the test class, right click on the Calculator class declaration in Android Studio select GoTo > Test and select Create New Test... (You can also use a short cut, Ctr +Shift + T)

In the dialogue window that appears only select JUnit4, setUp/@Before and all the methods to be tested as shown bellow and leave the rest to their defaults then click Ok.

At this point there is a test class generated at
app/src/test/java/com/example/testing/unitanduitesting
Bellow is how you might test your calculator class. so feel free to modify the skeleton test class at the location above to be like this bellow.
package com.example.testing.unitanduitesting;import org.junit.Before;import org.junit.Test;import static org.junit.Assert.*;public class CalculatorTest {private Calculator mCalculator;@Beforepublic void setUp() throws Exception {mCalculator = new Calculator();}@Testpublic void testSum() throws Exception {//expected: 9 sum of 5 and 4assertEquals(9d,mCalculator.sum(5d,4d),0);}@Testpublic void testSubtract() throws Exception {//expected 1, the difference of 5 and 4assertEquals(1d,mCalculator.subtract(5d,4d),0);}@Testpublic void testMultiply() throws Exception {//Expected 12, the product of 4 and 3assertEquals(12d, mCalculator.multiply(4d,3d),0);}@Testpublic void testDivide() throws Exception {//Expected 3, when you divide 12 by 4assertEquals(3d,mCalculator.divide(12d,4d),0);}}
To run your test, right click on TestCalculator select Run CalculatorTest (Short cut: Ctrl + Shift + T after selecting the TestCalculator class). You will note that your tests fail, this is so because we have not implement the arithmetic methods in the Calculator class, if you remember they are all returning zero (0). Android studio helps you to know how every thing went using the small tab window at the bottom which looks like bellow.

So let's implement the first method in Calculator class to do the right thing of adding two numbers as done bellow
public double sum(double a, double b){/*** This method adds a and b and returns the sum, before it was* returning a zero, so our test failed. Now it should pass.*/return a + b ;
}
Run the test Class again by clicking on it and pressing Ctrl + Shift + T , you will note that one test passed and three failed. So implement the rest of the methods and run the test.
Your Calculator class should be like this bellow
package com.example.testing.unitanduitesting;public class Calculator {public double sum(double a, double b){/*** This method adds a and b and returns the sum, before it w * as* returning a zero, so our test failed. Now it should pass.*/return a + b ;}public double subtract(double a, double b){return a - b;}public double multiply(double a, double b){return a * b;}public double divide(double a, double b){return a / b;}}
When implemented correctly and ran, you should see green as an indication that all tests passed

Congulatulations, that is Unit Testing in android studio where you test the smallest testable part of your app. You should have noted that no device was required. This is because such unit tests run on your local VM.
UI Testing.
Configure your project for instrumentation tests by modifying your build.gradle (Module:app) file like bellow
apply plugin: 'com.android.application'android {compileSdkVersion 23buildToolsVersion "23.0.2"defaultConfig {applicationId "com.example.testing.unitanduitesting"minSdkVersion 10targetSdkVersion 23versionCode 1versionName "1.0"//ADD THIS LINEtestInstrumentationRunner "android.support.test.runner.AndroidJUnitRunner"}buildTypes {release {minifyEnabled falseproguardFiles getDefaultProguardFile('proguard-android.txt'), 'proguard-rules.pro'}}//ADD THESE LINESpackagingOptions {exclude 'LICENSE.txt'}}dependencies {compile fileTree(dir: 'libs', include: ['*.jar'])testCompile 'junit:junit:4.12'//Modify appcompat-v7:23.1.1 use appcompat-v7:23.0.1 to avoid dependency conflictscompile 'com.android.support:appcompat-v7:23.0.1' //← ENSURE IT’S 23.0.1//ADD THESE LINES:androidTestCompile 'com.android.support.test:runner:0.4.1'androidTestCompile 'com.android.support.test:rules:0.4.1'androidTestCompile 'com.android.support.test.espresso:espresso-core:2.2.1'}
When done, go back to buildVariant perspective and switch from Unit Tests to Android Instrumentation Tests and wait for gradle builds to finish syncing automatically in case this does not happen then snyc the project manually by clicking on  located at the top of android studio.
located at the top of android studio.
With configurations ready, lets modify our app to look like this
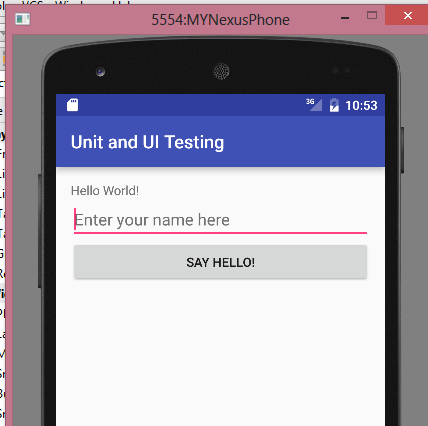
Modify your activity_main.xml found in res/layout to look look like this
actvity_main.xml
<?xml version="1.0" encoding="utf-8"?><RelativeLayout xmlns:android="http://schemas.android.com/apk/res/android"xmlns:tools="http://schemas.android.com/tools"android:layout_width="match_parent"android:layout_height="match_parent"android:paddingBottom="@dimen/activity_vertical_margin"android:paddingLeft="@dimen/activity_horizontal_margin"android:paddingRight="@dimen/activity_horizontal_margin"android:paddingTop="@dimen/activity_vertical_margin"tools:context="com.example.testing.unitanduitesting.MainActivity"><TextViewandroid:id="@+id/textView"android:layout_width="wrap_content"android:layout_height="wrap_content"android:text="Hello World!" /><EditTextandroid:hint="Enter your name here"android:id="@+id/editText"android:layout_width="match_parent"android:layout_height="wrap_content"android:layout_below="@+id/textView"/><Buttonandroid:layout_width="match_parent"android:layout_height="wrap_content"android:text="Say hello!"android:layout_below="@+id/editText"android:onClick="sayHello"/></RelativeLayout>
That done, go your MainActivity.java and add the onClick Handler with the implementation bellow.
public void sayHello(View view){TextView textView = (TextView) findViewById(R.id.textView);EditText editText = (EditText) findViewById(R.id.editText);String name = "Hey, " + editText.getText().toString() + "!";textView.setText( name );}The whole MainActivity.java file with the method above should look like this bellow.package com.example.testing.unitanduitesting;import android.os.Bundle;import android.support.v7.app.AppCompatActivity;import android.view.View;import android.widget.EditText;import android.widget.TextView;public class MainActivity extends AppCompatActivity {@Overrideprotected void onCreate(Bundle savedInstanceState) {super.onCreate(savedInstanceState);setContentView(R.layout.activity_main);}public void sayHello(View view){TextView textView = (TextView) findViewById(R.id.textView);EditText editText = (EditText) findViewById(R.id.editText);String name = "Hello, " + editText.getText().toString() + "!";textView.setText( name );}}You are ready to create and run your espresso test now.Go the package ending in androidTest suffix and create a java class with an name MainActivityInstrumentationTest.

You can copy and paste the code bellow into your MainActivityInstrumentationTest.Java
package com.example.testing.unitanduitesting;import android.support.test.rule.ActivityTestRule;import android.support.test.runner.AndroidJUnit4;import android.test.suitebuilder.annotation.LargeTest;import org.junit.Rule;import org.junit.Test;import org.junit.runner.RunWith;import static android.support.test.espresso.Espresso.onView;import static android.support.test.espresso.action.ViewActions.click;import static android.support.test.espresso.action.ViewActions.closeSoftKeyboard;import static android.support.test.espresso.action.ViewActions.typeText;import static android.support.test.espresso.assertion.ViewAssertions.matches;import static android.support.test.espresso.matcher.ViewMatchers.withId;import static android.support.test.espresso.matcher.ViewMatchers.withText;@RunWith(AndroidJUnit4.class)@LargeTestpublic class MainActivityInstrumentationTest {private static final String STRING_TO_BE_TYPED = "Nsubuga, this is awesome";@Rulepublic ActivityTestRule<MainActivity> mActivityRule = new ActivityTestRule<MainActivity>(MainActivity.class);@Testpublic void sayHello(){//first RuleonView(withId(R.id.editText)).perform(typeText(STRING_TO_BE_TYPED),closeSoftKeyboard());//Second RuleonView(withText("Say hello!")).perform(click());String expectedText = "Hello, " + STRING_TO_BE_TYPED + "!";//Third RuleonView(withId(R.id.textView)).check(matches(withText(expectedText)));}}
You are ready to run your espresso test, right click on the class and select Run > MainActivityInstrume... or click on the class and then press Ctrl + Shift + T
You will need a device or emulator for this, keep your eyes on the screen of whatever device you are using. You will see text being typed and a button being clicked and the green back Android Studio when the tests pass.
Good resources for you to read more.
Testing concepts
http://developer.android.com/tools/testing/testing_android.html
Building effective Unit Tests
https://developer.android.com/training/testing/unit-testing/index.html
Android Testing Support Library
https://developer.android.com/tools/testing-support-library/index.html
Espresso setup instructions
https://google.github.io/android-testing-support-library/docs/espresso/setup/
You can leave some comments to help me improve on this post.


